
Starling’s Hexagon Bear
Starling’s Hexagon Bear Crochet Pattern
The shapes that I designed here only have 3 rounds, and I used either Red Heart Super Saver Yarn or Caron Simply Soft yarn. So you shouldn’t have to bother with that tiny crochet-thread stuff. I use an F, G, and H hook; and I make the shapes first later sewing them together using the back loops only.
*Note: Don’t let anyone out there convince you that you can’t do something like this on your own. I know geometry can be complicated sometimes, but it’s not very difficult to bring your own ideas to fruition. Think about this: Create or find your own shape patterns, trace them on fabric, and then cut out a zillion copies of the shapes in fabric. Then you can grab your son’s T-Rex doll and start taping those shapes all over it until they fit. Heck, use my shape pattern, make one of each, trace them and go for your own creations as well! You are creative and you should express that!
*One last note: I would not give this to a tiny, tiny kid that can’t process not to eat stuffing. If I was a tiny kid, I would think the stuffing you can see through my shape patterns would look so yummy. I would totally eat that stuffing like the fair only came around once a year and there was no where else to get cotton candy. Yep. I’d swallow chunks of it like I was a vindictive dog that walked in on an abandoned bowl of the cat’s food that the kitty hadn’t noticed yet. Yummy. Is that disclaimer clear enough? Tee-hee, *snort*
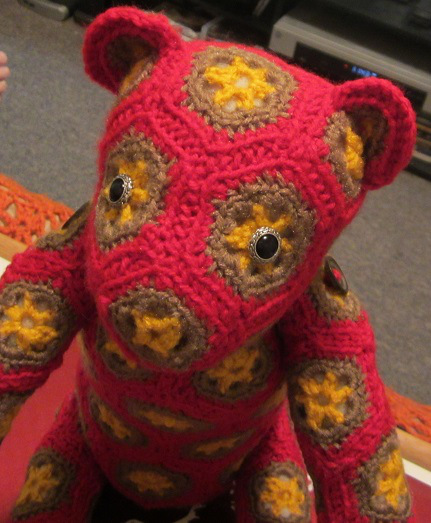
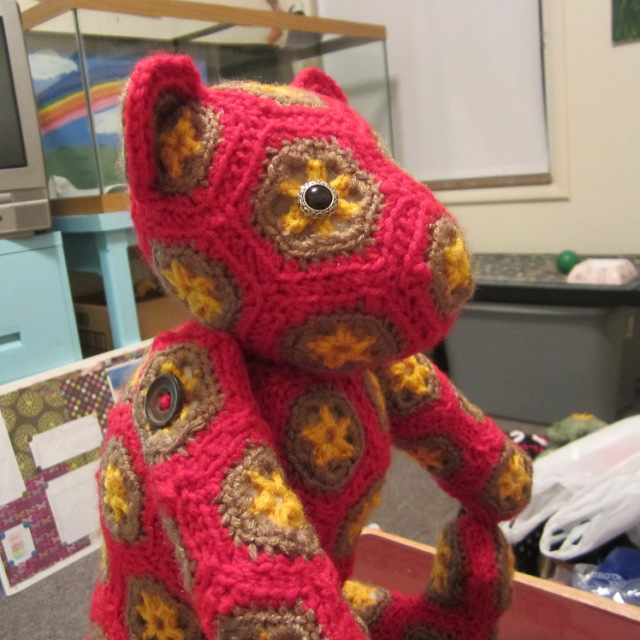
I made these hexagon, pentagon, and square patterns, because I am a lazy crocheter, as my ghoulz know, and I have a lot of pain in my joins and my vision is bad, so I loath trying to work with tiny hooks and tiny yarn. Hopefully these shapes will be large enough for all my achy-ghoulz out there not to go cross-eyed. I use only 3 hook sizes: a G hook and an F hook, (and briefly an H hook with 2 strands of yarn held together to make the paws curve, which you could substitute with the G hook if you really want). Again, I use these larger hooks so they’re easier to see and work with. I like bigger hooks; what can I say? Instant gratification pleases me! You can probably alter any hexagon patterns you find out there to make interesting hexagon critters like our grandmas used to make as long as you have a matching size hexagon, pentagon, and square pattern. I don’t add any construction images here because I decided to go for this as a pattern rather than a tutorial. The reason I made this pattern is because I created the bear for my mom as a Christmas gift and I’m always wishing people would jot down what they do as they go along when they make random patterns so that they have a reference to give when people say, “Ermegersh! How do I make mine?!” It’s really not as complicated as it looks. I’ll tell you the number of shapes for each body part and I have faith in you! You can figure it out just like I eventually did! What I did was make all my shapes and then I sewed them together later. If you are insecure about how to connect them, simply do what I did while playing with it and don’t tie a zillion knots in your connecting yarn so that you can just pull it all out if you get it all together and then realize you have one backward shape, lolz! (That happened to me quite a few times…)
_____________________________________________________
* First thing’s first. Here is how I made the hexagons, pentagons, and square, but before you get started check each section to see which hook size to use and how many of each to use for the different body parts.
Tiny hexagon:
Rnd 1: Ch 5, join in the first chain to form a ring. Working this round in the ring, ch 1, (sc, ch 3,) 6 times. Join with a sl st in first sc. (6 sets of ch-3 arches.)
Rnd 2: Join with a sl st in any ch-3 space. Ch 1. Work 5 sc in each ch-3 space around. Join with a sl st in first sc.
Rnd 3: Working in back loops only for the entire round: Join with a sl st in the center st of any 5-sc spots. Ch 3 (works as first dc, ch-1), sc in the next 4 sc, ch 1, dc in the next (center) sc, ch 1. (sc in next 4 sc, ch 1, dc in center sc, ch 1) 5 times. Join with a sl st in the 3rd chain of the first ch-3. Fasten off and weave in ends.
Tiny Pentagon:
Rnd 1: Ch 5, join in the first chain to form a ring. Working this round in the ring, ch 1, (sc, ch 3,) 5 times. Join with a sl st in first sc. (5 sets of ch-3 arches.)
Rnd 2: Join with a sl st in any ch-3 space. Ch 1. Work 5 sc in each ch-3 space around. Join with a sl st in first sc.
Rnd 3: Working in back loops only for the entire round: Join with a sl st in the center st of any 5-sc spots. Ch 3 (works as first dc, ch-1), sc in the next 4 sc, ch 1, dc in the next (center) sc, ch 1. (sc in next 4 sc, ch 1, dc in center sc, ch 1) 4 times. Join with a sl st in the 3rd chain of the first ch-3. Fasten off and weave in ends.
Tiny Square: (nose and below the ears)
Rnd 1: Ch 5, join in the first chain to form a ring. Working this round in the ring, ch 1, (sc, ch 3,) 4 times. Join with a sl st in first sc. (4 sets of ch-3 arches.)
Rnd 2: Join with a sl st in any ch-3 space. Ch 1. Work 5 sc in each ch-3 space around. Join with a sl st in first sc.
Rnd 3: Working in back loops only for the entire round: Join with a sl st in the center st of any 5-sc spots. Ch 3 (works as first dc, ch-1), sc in the next 4 sc, ch 1, dc in the next (center) sc, ch 1. (sc in next 4 sc, ch 1, dc in center sc, ch 1) around. Join with a sl st in the 3rd chain of the first ch-3. Fasten off and weave in ends.
Special Hexagon for the ear. (Make two)
Work the hexagon the same as above through round 2.
Then for round 3 you’re basically adding less stitches to make the shape curve: Working in back loops only around, join with a sl st in any st, (ch 1, sc) in same st as join. Sc in next st and each st around. Join with a sl st in first sc.
Fold the hexagon in half and stitch it into a half circle type shape. It should curve slightly. Attach to head by curving them along the back edge of each ear-square patch.
_____________________________________________________
Head:
Using G hook for all, make:
5 hexagons
6 pentagons
1 square for nose
2 squares for ear patches
2 special hexagons for the ears.
The construction of the head, I feel, can only be explained by looking at pictures of the head and placing the squares, hexagons, and pentagons where you see them. I will add pictures of the head so that you can see where to put the shapes. Since they’re all made with the same hook size, all you really have to worry about is placing them correctly.
_____________________________________________________
Body:
Using 2 different hook sizes on the shapes for the body will give the body a little more of a slight hourglass shape than if you used the same hook size on all the shapes; then it would be cylindrical. The bottom of body shapes will be made using G hook so that it is wider down there. The middle section is made with an F hook so that it will be slightly smaller and dip in, and the top part with an F hook so that it will be a tick smaller than the bottom (hips). There will be 32 motifs total.
G hook: 1 hexagon that you will use for the very top of the body after Rnd 5.
7 hexagons, 6 pentagons
The 7 hexagons and 6 pentagons mentioned above will be used like this:
The Base = 1 of these G-hook hexagons. I say that Rnd 1 is worked around this one hexagon.
Rnd 1= (from the bottom-up, working around the base hexagon) is made of these 6 G hook pentagons.
Rnd 2 = (the round you’ll attach above round 1) is made of the other 6 hexagons.
F hook: 6 hexagons (These will make the very middle of body, which is Rnd 3)
6 hexagons, 6 pentagons (Hexagons make Rnd 4, and Pentagons Rnd 5)
_____________________________________________________
Arms: (Make two)
Each arm will have 8 hexagons total.
The first hexagon of each arm, (the outer paws because it will cause a very slight bend when attached to the normal hexagon and give the normal hexagon a palm type curve), you will hold two yarn strands together and use an H hook for round 1 and then go back to using one yarn strand and a G hook for rounds 2 and 3.
The rest of the hexagons (7 more for each arm) will be done with a G hook.
I also don’t see very much difference with just making all the hexagons the same with the G hook all the way through and single strands of yarn, and simply making 8 for each arm. So if the alteration for the first one sounds too complicated, just make ‘em all the same and it’ll be okay too. Like I said, this construction is basic, so unless you do something drastic to change the hook/yarn size, it’s simple physics as to how it goes together.
_____________________________________________________
Legs: (Make two)
9 motifs total for each leg.
There will be 2 pentagons (bottom of foot) and 7 hexagons (one for the top of the toes, two for the heel, and 4 for the legs.
Use a G hook for 6 of the hexagons, but for one hexagon, (which will be the top of the foot, or the toes) , you will use an H hook and two strands of yarn held together for round 1, and then return to the G hook and one strand of yarn for rounds 2 and 3.
1st pentagon: (This will be the underside of the toes.) For rounds 1 and 2 you will use an H hook and two strands of yarn held together. Then for round 3 you will return to a G hook and a single strand of yarn.
2nd pentagon: (This will be the heel) For round 1 you will use an H hook and two strands of yarn held together, and then return to G hook and single strand of yarn for rounds 2 and 3.
_____________________________________________________
Construction:
When I sew together the hexagons/pentagons/square, I use a yarn needle and I hold the shapes against one another as if I’m keeping the wrong sides together, even though they are constructed side-by-side, and I sew them through their back loops only. This gives that pleasant outlining you can see around each of my shapes. If you use the entire stitch you won’t have that effect, but it’ll still be cute!
I used buttons for the eyes, and when I attached the arms and legs I threaded thick yarn thread through the button on one side of the body, the arm, and all the way through to the other button. Doing it that way will allow you to move the legs and arms instead of sewing them on stiff. If that’s complicated and you don’t feel like getting fancy, just sew them right onto the body!


hey – i actually like your hexagons and such better than Heidi’s african flowers – yours has more dimension and character!!! – THANK YOU TNAK YOU THANK YOU for sharing!!!!!
Thank you for creating this pattern for free. I can’t wait to make one for my grandson and nieces.
Thanks for this pattern and words of encouragement. I too was scared off by tiny hooks and thread. I am going to try this. Thank you again.
Oh thank thank you! This is Awesome!
Thank you for the instructions! They were really helpful. A tiny hint about the stuffing – I used see-through stockings as a lining material before stuffing the crochet pieces. Stockings (or pantyhose) are really stretchy, so they can be shaped in whatever way you need and they keep stuffing from peeking out of the shape patterns. Easy hack that makes it baby-friendly. 🙂
I am going to try this bear! I am alittle nervous never done anything like this!!!
You can do it! 🙂
I’m so excited to begin this new project. Teddy’s are classic and so precious. I know you have brought joy to many crafters such as myself with this beautiful creation. Thanks again for sharing this pattern with us all and wish you continued blessings in life. Keep crafting and doing what you love, your crocheting is beautiful!
Good luck! 🙂 And thank you!
Can you please add a picture of the back of the head please that way I can see were to place these cute hexagons and pentagons . I love this pattern so much.
😦 I don’t have a picture of the back of the head, I’m sorry! I made this bear as a gift for my mom and she lives out of town. Try doing an image search for hexagon bears. Lot’s of people make shape creatures and there are a kazillion images out there that might help you to easily figure it out. Good luck! 🙂
I was going through some some old files and FINALLY found what happened to the pictures for the back of the bear! I know it’s really really too late, haha, but I just thought I’d comment for this inquiry since I remember you asked about it. I’m going to add it here in just a second to the very end of the pattern up there.
I absolutely cannot wait to do this, however I am a little nervous!!!
Which body part do you start with, or does it not matter? Thank you for the lovely pattern, I’m really grateful!
I like starting with the head so I can hang out with the bear’s personality in my mind for inspiration while I finish the rest. It’s easier to get side-tracked and put the project off if I have an arm looking at me than it is if I have a cute lil’ face looking at me waiting for the rest of the body to be finished.
Am I VERY blonde today ? I only see patterns for special hex, pent, small sq & spec hex, no pattern for reg hex and so forth? Houston, I have a problem, I may be malfunctioning? I have all my yarns & hooks ready, sitting back in my chair, looking for the regular hex & pent, ready to go. Do I need to abort the mission? Waaaaaaa! Please help!
Haha, I think I see what’s going on. I labeled the hexagon and pentagon patterns ‘tiny’ hexagon and ‘tiny pentagon, but those are the only hexagon/pentagon/square patterns that are used. You use the same pattern, and the only thing that will make them a different size is if you use a larger/smaller hook, but the pattern will stay the same. I state which hook size to use as the pattern goes along.
Ahhhhhhhh……. So now I will get myself settled back and give ‘er another try. 🙂 Thanks so much, and thank you for making this beautiful bear available to us as a free pattern, I absolutely love it!
Hi! Wonderful TUT! I think I would get a muslin which is usually $1.99 or less at Wal-Mart per yard to line this with and probably embroider eyes and a mouth, or even make smaller hexes for the eyes and motif style them! after you are done with half the bear lay it as flat as possible and make a template for your lining, that’s how I line my purses!
Great advice!!! 🙂
Thank you so much for sharing your pattern for the bear, he is adorable. He will be one of my next projects to do. Have you done any other animals like this?
Under my patterns list you can find a jellyfish and a octopus that I did in shapes:
I have designs on Ravelry, too, where I did a cat in shapes: http://www.ravelry.com/designers/starling
Thank you so much for making this pattern available for free! being in a different country to the US the exchange rate makes it alot more expensive than 7, in my currency it would be wellover a 100 ! at that price cheaper to buy a bear…lol….so I am and my girlie who can’t wait for her bear – are indebted to you 😉
Thanks! Wonderful idea!