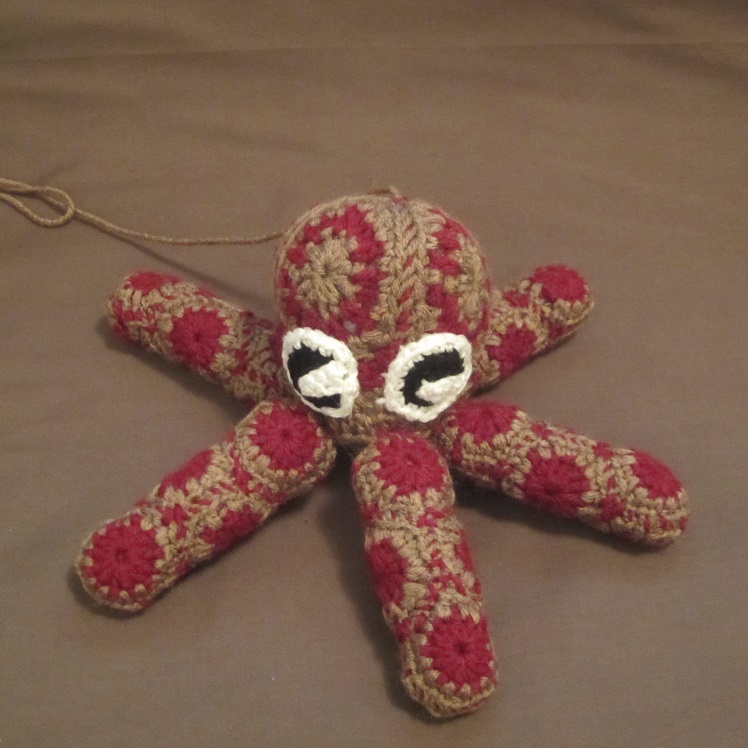
Pentapus: Granny Octopus Crochet Pattern
I use Red Heart Super Saver Yarn, a yarn needle, and an F and K hook.
*Note: I like joining my shapes using the back loops only. You can do whatever you’re comfortable with!
For Body, use a K hook and make 4 altered Pentagons:
Rnd 1: Ch 3. In 3rd ch from hook, (2hdc, ch 1) 5 times. Jn with a sl st.
Rnd 2: Jn or sl st to the first of any of the two hdc stitches, ch 1. Beginning in same st as join, *Sc, sc, (ch 1, hdc, ch 1) in the ch-1 space. Repeat from * around. Jn with a sl st in first sc.
Rnd 3: Jn or sl st to the first of any two single crochet stitches. Beginning in same st as join, (Sc, sc, hdc in ch-1 space, dc, hdc in ch-1 space), twice. Sc, sc, hdc in ch-1 space, sc, hdc in ch-1 space, hdc, dc, dc in ch-1 space, dc, dc in ch-1 space, hdc, hdc, sc in ch-1 space, sc, hdc in last ch-1 space. Jn in first sc.
Sew the four pentagons together.
To create the bottom 3 rounds of the body:
Working in back loops only, jn yarn with a sl st along the bottom of the project. Ch 1, hdc in same st as jn. Hdc in each st around, and in each of the the places where two shapes are joined you’ll treat the corners as one hdc by doing a dc decrease bewteen them. After that I add two more hdc rounds, joining each round with a sl st in the first hdc. Do not fasten off after last round.
Very bottom of body:
Ch 2, and working in back loops only, dc decrease around. Jn with a sl st in the first dc-dec stitch. Fasten off leaving tail long enough to sew the bottom opening closed. Stuff the body well and then sew it closed. (I also like to leave a long enough tail to thread it up through the center of the body after I sew it closed to use to hang the Pentapus for decoration.)

Hexi-legs on a Pentapus:
I make only five legs because it’s a Pentapus…but if you want more or less legs, have at it!
Use an F hook and make 6 hexagons per leg. Attach hexagons so that each side of the leg comes to a point. (Hexagon pattern below.) Attaching the legs with a pointed end will make them pleasantly floppy. If you prefer stiff legs, then make two pentagons instead of the last two hexagons, and then fit those two pentagons into the bottom instead of hexagons so that the leg will have a round opening as more of a cylindrical shape on one end, while the other end will still end in a point with the hexagons. Then you can place the leg where you’d like it and sew around it in a stiff circle. I preffer floppy legs, personally.
Hexagon:
Rnd 1: Ch 3. In 3rd ch from hook, (2hdc, ch 1) 6 times. Jn with a sl st.
Rnd 2: Jn or sl st to the first of any of the two hdc stitches, ch 1. Beginning in same st as join, *Sc, sc, (ch 1, hdc, ch 1) in the ch-1 space. Repeat from * around. Jn with a sl st in first sc.


I then added my anime eyes:
Cute eyes:
Use F (3.75 MM) hook for the eyes.
(Make two.)
Rnd 1: With black, Ch 2, 6 sc in 2nd ch from hook. Do not join. (6 sc)
Rnd 2: 2 sc in each st around. Jn with sl st in first sc. Fasten off. (12 sc)
Rnd 3: With white and working in back loops only, join with a sl st in any sc. Ch 1, 2 sc in same st as join, sc in back loop of next st, (2 sc in the back loop of next st, 1 sc in back loop of next st) around. Join with a sl st in 1st sc. Don’t fasten off. (18 sc) For pupil, you will now chain 4 and sc in 2nd chain from hook and next 2 ch. Sl st in front loop of next st. Fasten off with tail long enought to sew pupil to eye and the eye to head. Fold strip down into the black of the eye and sew it into place.