
**********
Okay ghoulz! I need to add some notes here about size!
It’s come to my attention that my kitty sweater patterns are on the small side. I’m going to make notes, but if you want larger patterns, add more chains in the beginning chain to shape the chest. Since I make the arm hole rows early on, you can use this to slide it onto your pet and see if you like the size or if you want to adjust it before you spend a lot of time making it only to find it is too small. The patterns are written to where it’s pretty basic to adjust for a larger beginning chain. That being said, I have not yet done any adjustments for larger pets.
When I made this pattern, our kitty, Mizzy, was very old, and she was a petite kitty. This pattern is for tiny cats, or teen/older kittens. I’ve seen it used for a rabbit sweater, and it worked for me when I made one for a chihuahua/rat terrier sized extra small dog. So if you’re wanting notes on the size, there ya go!
Mizzy Kitty passed away a few years ago, and we now have a kitten, October the Cat-Toby Toebeans. I call him a kitten, but he is two years old this month, (October 2021)! I just tried to make him a sweater, and he is ALREADY TOO BIG for this sweater, LOL! This made me think that I’d better make some notes on the size to go with this pattern, so I’ll be adding this at the beginning of both the patterns.
Now…on to the pattern!
~ Starling
********
Kitty or Small Dog Sweater Pattern
I use Red Heart Yarn, but the pattern seems to work well with many different yarn types. I use a size K hook, (6.5 MM), and a yarn needle to help me weave in the ends more easily.

Chest of Sweater:
Rnd 1: Ch 42 loosely, Jn with sl st in first ch to form a large ring. Ch 2, dc in same ch and in each chain around until you have about 40-42 dc not including the first ch-2. Jn with sl st in first dc.
Rnd 2: Ch 2, dc in same st. To form first arm hole, chain 5 loosely. Sk next 4 st, dc in 5th st. Dc in next 3 st, 5 dc bobble in next st, dc in next 4 st. To form next arm hole, chain 5 loosely, sk next 4 st, dc in 5th st. Dc in next st. 5 dc bobble in next st. (Dc in next 8 st, 5 dc bobble in next st) around. Jn with a sl st in 1st dc.
Rnd 3: Ch 2, dc in same st, dc in next st and around working 4 dc in each ch-5 arm hole space. Jn with a sl st in 1st dc.
Rnd 4: Ch 2, 3 dc in same st, sk next 2 st, (3 dc in next st, sk next 2 st) around. Skip last 3 st rather than just the 2 and join with a sl st in 1st dc.
Rnd 5: Sl st to the nearest space between 3 dc fans cluster. Ch 2, 3 dc in each space between the 3dc fan clusters around. Jn with a sl st in first dc.
Rnd 6: Repeat round 5.
Back of the Sweater:
Now will begin working back and forth in rows instead of around which will form the back of the sweater.
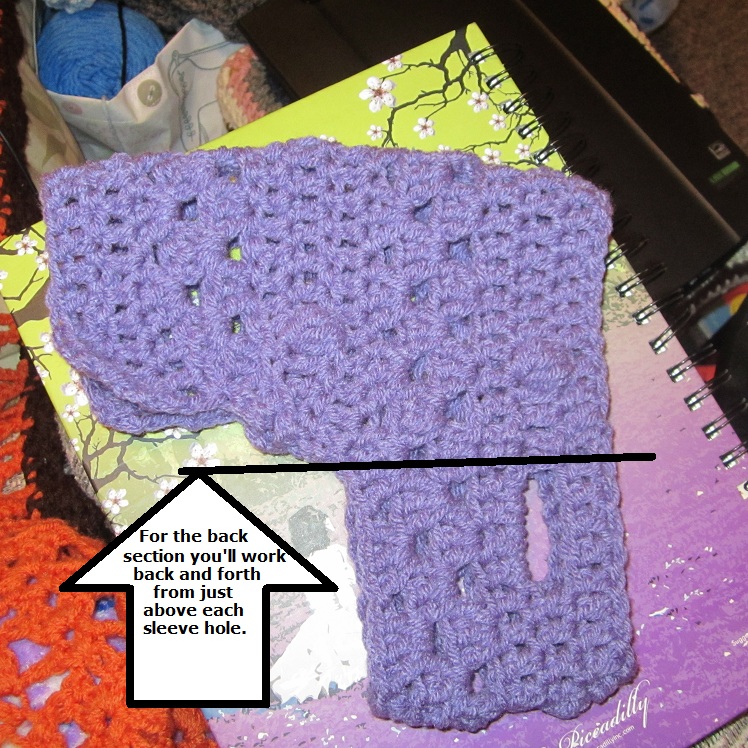
Row 1: Sl st until you are even with the outside (upper) point of the closest armhole so that your rows will be starting just above one armhole and ending just above the other armhole back and forth. When you get to your starting point, ch 2, dc in same st and across until you’re even with the top of the opposite armhole. (There should be about 25 dc not including the first ch-2)
Row 2: Turn, sl st in same st, sc in next st, 5 dc bobble in next st, dc in next 8 st, 5 dc bobble in next st, dc in next 8 st, 5 dc bobble in next st, dc to last 2 st, sc, sl st in last st.
Row 3: Ch 1, turn, sl st in same st, sc, hdc, dc across to last 3 st, hdc, sc, sl st.
Row 4: Ch 1, turn, sl st in same st and next st, sc, (3 dc in next st, sk next 2 st) across to last 3 st. Sc, sl st, ignore last st.
Row 5: Ch 1, turn, sl st in same st and next st, sc, 3 dc in each of the spaces between clusters across. After last space, sk next 2 st, sc, sl st.
Row 6: Ch 2, turn. Dc in same st, dc in next 2 st, 3 dc in each space across, sk next st, dc in next 3 st.
Row 7: Ch 2, turn. Dc in same st and in each st across.
Row 8: Ch 2, turn, dc in same st, 5 dc bobble in next st, dc in next 8 st, 5 dc bobble, dc in next 8 sts, 5 dc bobble, dc to end.
Row 9: Repeat Row 7.
Row 10: Ch 1, turn. Sl st in same st and next st, sc, sc, hdc, hdc, dc, dc, tr crochet in next 5 st or until you have 8 st left. dc, dc, hdc, hdc, sc, sc, sl st, sl st.
Row 11: Repeat row 10. Fasten off and weave in ends.
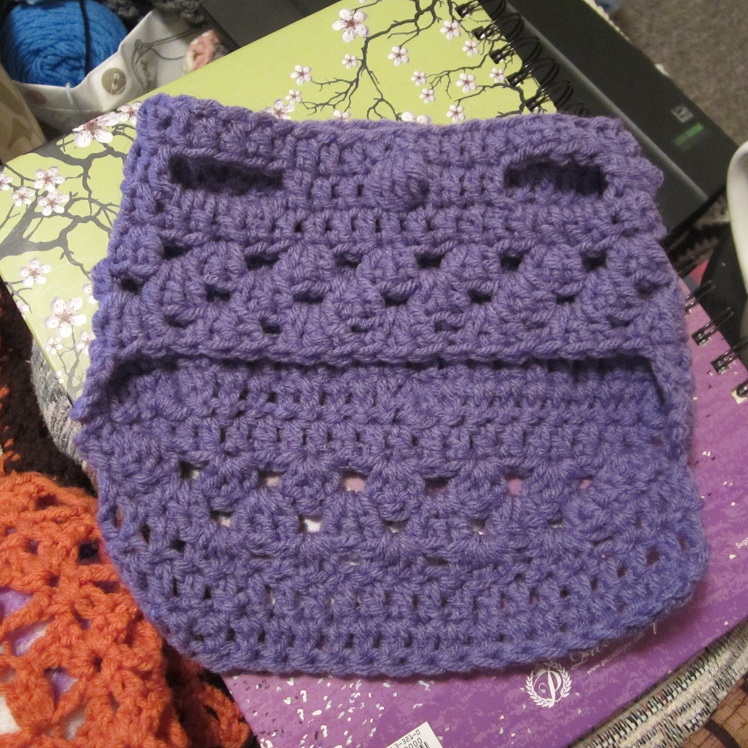
Front Section: (Basically this will fill in the bottom half of the front of the sweater. You’ll join with a sl st along the bottom section of the front just in line with the outside of one of the legs. Then you’ll dc across until you reach even with the outside of the opposite leg hole. You’ll be turning the work and working back and forth to form the front square of the sweater.

Row 1: Jn with a sl st in the original chain just outside of one leg hole. Ch 2, dc in same ch and across to just outside the 2nd leg hole.
Row 2 and 3: Ch 2, turn, dc in same st and across. Fasten off after row 3.
Fold the square section in toward the neck direction of the sweater. Use a yarn needle to sew this flap section into place along the chain at the sides leaving only the neck hole at the top where you’ll then be able to work around to form a colar or turtleneck. If you want to get fancy then you can turn the sweater in-side-out right now to sew the front in place so that it will have a more rounded appearance on the outside rather than squared, but I don’t notice too much difference either way.

Sleeves:

Rnd 1: Jn with a sl st at the leg hole. Ch 2, dc in same place as join, dc evenly around and join with a sl st in first dc. If this is long enough for you then fasten off and waeve in ends. If not, repeat next rnd until the sleeves are as long as you’d like.
Rnd 2: Ch 2, dc in same st and around. Jn with sl st in first dc.
Neck:
Rnd 1: Jn with sl st anywhere along the neck. Ch 2, dc in same st, dc in next st and around, excepct dc dec in each of the two corners where the neck meets the front of the sweater. Jn with sl st in first dc.
Rnd 2: Ch 2, dc in same st and around. Jn with sl st in top of 1st dc. Repeat Rnd 2 until neck is as tall as you’d like.
Border:
For the border, jn with the color of your choice with a sl st somewhere along the edging. (Ch 1, sl st) around. Jn with sl st, fasten off, weave in ends.

Pingback: Turtle and Mizzy Kitty Cat’s Christmas Sweater | craftyghoul
Pingback: Sweater Weather | lsmcreation
Pingback: Size Notes for Pet Sweater Patterns | craftyghoul