
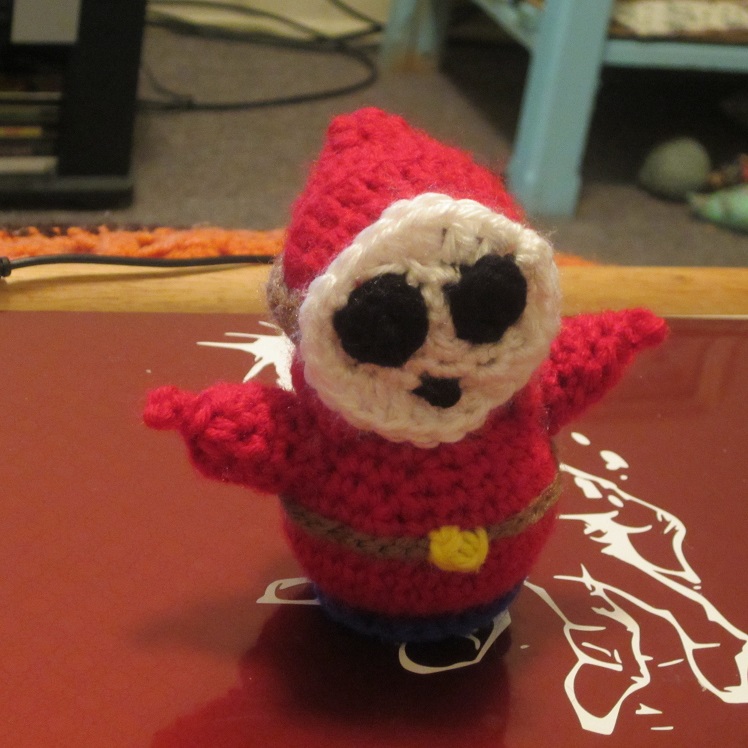
I used a pattern in the Creepy Cute Crochet book I have and tweeked it around, (also adding some of my own designs), to make a Shy Guy for my husband! (Shy Guy is a character from a Mario Bros. video game.)
If you are interested in the book I mentioned, you can find it on amazon here: Creepy Cute Crochet, by Chriten Hayden
When I was a beginner at crocheting, I had a lot of trouble following the patterns in this book, but I was still happy with my purchase simply for the inspiration pictures alone! Then when I gained only a little bit of experience I was able to follow along with the patterns and easily assume the little things she doesn’t specify in the patterns that should have been common sense for an intermediate crocheter, but I just didn’t know what I was doing at the time. Now I have much experience and I don’t have to think twice about how to tweak the patterns to make all kinds of creative things! Ultimately I’m really , really glad I got this book, and I would recommend it even if it’s just to look at inspiration pictures for the critters inside!!
Now! On to more Shy Guy Pictures, and then I will share the things I did to make him, but to get the body, head, and hood pattern, you’ll need to buy the book because it isn’t my pattern to share; so I’m not going to classify this as a free pattern, but instead it’s like an accessory pattern for those of you that have the Creepy Cute Crochet book.


Shy Guy Creepy Cute Crochet Variation
(Accessory Pattern Only! Does not include body, hood, or head pattern from book!)
* I used an F hook for the body, head, hood, and everything accept for the mask.. On the mask I used a K hook.
Mask:
Use K hook for Mask:
Rnd 1: Ch 2, 6sc in first ch. (6 sc)
Rnd 2: 2 sc in each st around. (12 sc)
Rnd 3: (2sc, sc) around. Jn with a sl in next st. (18)
Rnd 4: Ch 2, dc in same st as join. Dc in next st, (dc, hdc) in next st, hdc, sc, 2sc, sc, hdc, (hdc, dc), dc, dc, (dc, hdc) hdc, sc, 2sc, sc, hdc, and join with a sl st in first dc.
For head strap that holds mask on:
With F hook, ch 27, sc in 2nd ch from hook and across. Fasten off.
For belt strap:
With F hook ch 36. Fasten off leaving tail long enough to sew to body. Then with a little yellow yarn and a yarn needle add buckle in front.
Eyes:
(Make two.)
Ch 2, in 2nd ch from hook work 6sc. Jn with a sl st in first sc. Fasten off leaving tail long enough to sew to mask. I leave an extra long tail on one eye so that I can use the excess to feed down the mask and stitch his mouth.
Mouth:
I simply stitch the mouth with leftover yarn from the eyes.
Feet:
I repeated the mask pattern and used blue. Then sew to the bottom of body for balance.
Arms:
Rnd 1: Ch 10 and jn with sl st in first ch. Ch 1, sc in same st and around. Jn with sl st in first sc. (10 sc)
Rnd 2: Ch 2 and flip work so that you’ll be working in the original chain once again. Sl st in any ch. (Or you can faste off at the end of Rnd 1 and join in original ch with a sl st if you’d like for the arm to be perfectly smooth.) Ch 1, sc in same st and around. Jn with sl st in first sc. (10 sc)
Rnd 3: Ch 1, sc in same st as join. Sc in next st, decrease, sc, sc, decrease, sc, sc, and then join with a sl st in the first sc. (You should now have 8 stitches to work the next rnd into.)
Rnd 4: Ch 1, decrease around using the same st as join in your count. Jn with a sl st in first sc. (4 stitches.) Now to make the arm a little more pointy, chain 3, sc in 2nd ch from hook and in next ch, then join with a sl st in the arm wherever you can make it look even. Fasten off. Stuff arm and sew to body.
