
I know it can be difficult to figure out how to make things in just the right size for you, especially when there are a ka-zillion different patterns out there using unfamiliar yarn and hook sizes you just want to forget about use your favorite one instead. Here a simple concept pattern that can be easily adapted for your cold lil’ toes!
Easily Adjustable Crochet Slippers
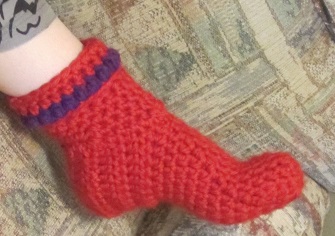
* I use a size N (9.00 MM) hook and Lion Brand Super Bulky (6) yarn.
Toes (Front of the slipper):
Ch 4, jn in the first ch to form a ring.
Rnd 1: Ch 1, 8 sc in ring. Jn with a sl st in first sc. (8 sc)
Rnd 2: Ch 2, hdc in same st as jn. 2 hdc in the next st., (hdc, 2hdc) around. Jn with a sl st in first hdc. (12 hdc)
Rnd 3: Ch 2, hdc in same st as jn. Hdc, 2hdc, (hdc, hdc, 2hdc) around. Jn with a sl st in first hdc. (16 hdc)
* Size adjustment note: The point of these rounds is for the tip of the toes to get wider until you are ready to continue on in single hdc rounds to create a straight, cylindrical shape. When the toes are wide enough, you can stop increasing and skip to round 5, but if you want the shoe wider than what I have here then you can continue the increase pattern for another few rounds. For example: Rnd 2 was (hdc, 2hdc) around, Rnd 3 was (hdc, hdc, 2hdc) around, Rnd 4 is (hdc, hdc, hdc, 2hdc) around, so if you add another increase round it would be (hdc, hdc, hdc, hdc, 2hc) around. Make sense?
Rnd 4: Ch 2, hdc in same st as jn. Hdc, hdc, 2hdc, (hdc, hdc, hdc, 2hdc) around. Jn with a sl st in first hdc. (20 hdc.)
Rnd 5-?: Ch 2, hdc in same st and in each st around. Jn with a sl st in first hdc. (20 hdc in each round.) Repeat Rnd 5 until slipper is long enough for you to begin creating the opening. (For me this will wind up being Rnds 5-12.)
Divide for sides and sole:
*You will now be working back and forth, turning the work, rather that all the way around.
Row 1-?: Ch 2, turn work. Hdc in same st and around, but don’t join. Instead, Ch 2, turn, hdc in same st and back around. Work the rows back and forth in this way until the slipper is long enough to close behind the heel. Turn the slipper in-side-out (right sides together) and stitch the heel closed at the end. (I have 8 rows here.)
Top/ankle:
Rnd 1: Jn with a sl st in the center of the heel. Ch 2, hdc in same st and around, accept you will be adding 6 decreases around the top of the shoe. Once at the beginning, once on each side, once in each of the front corners, and once at the very end of the round. Jn with a sl st in first hdc.
Rnds 2-?: Read the size adjustment note for ankle first, and then carry on with this round. Ch 2, hdc in same st and in each st around. Join with a sl st in first hdc. Repeat Rnd 2 until the ankle is as tall as desired. Then fasten off and weave in ends. (I have 5 rounds when I’m finished.)
*Size adjustment note for ankles: You can adjust the width of the ankle in the rounds to come. If you want it tighter, decrease evenly 4 to 6 times around the ankle. If it’s tighter than you’re comfortable with you can increase in a few places evenly around. Join with a sl st in first hdc and repeat round 2, adjusting as desired, until the ankle is as tall as you’d like.
Bobble Round:
If you’d like to add a bobble round the way I did, then I used normal Red Heart Yarn and a size K hook. I worked this round after the 5 ankle rounds in red. So this would be round 6.
Jn with a sl st in the center of the back. Working in the back (inside) loops only, Ch 2, do a 4dc bobble, then in the next st and in each st around work a 5dc bobble. Join with a sl st in top of first bobble.
How to 5dc bobble: (YO, insert hook and pull up a loop, yo, pull through 2 loops on hook) 5 times, yo, pull through all 6 loops on hook.
I then added one more hdc round with the chunky red yarn and then one last single crochet round on top of that.


Hi there! These look great, I started making them tonight, just finished the toe part of my first slipper. Im about to begin the sides/sole, and am wondering where the seam of the toe section ends up? Is it on the top of the foot or the sole? Thanks!
In the last picture on my left foot if you look closely you can see a kind of horizontal slash.That’s my seam. I think the seam winds up being kind of across the top of the foot with the way I’ve written the pattern, but if you want it at the bottom you can fasten off after the toe section and rotate it so that you join on the opposite side of the toes from where you see seam. Then work back and forth to make the sides. I don’t feel like my seams are all that noticeable, so I just ignore them and keep working through it without fastening off. It’s another one of my lazy techniques, I think, haha!
Also, the ‘toe’ section actually goes all the way up the front of the foot and only splits when you have to begin making an opening for your ankle, so that’s why you start working back and forth in rows rather than in rounds. So you can choose where you want to begin creating your back and forth rows; I just keep going the way I was to avoid having to fasten off and rejoin because I don’t like weaving in ends and therefore create as little ends to weave in as possible. I love to crochet, but I like chunk yarn, large hooks, and projects that work up fast, hehehe! Instant gratification!
Thank you for the BEST, easiest, quickest slipper pattern on the web!
I’ve spent weeks looking for a pattern to make my bf who has endstage cancer. She’ll be so happy!!
Chris
I’m glad you like it! I’m a lazy crocheter, so when I create patterns it’s usually because I wanted one thing or another and all the existing patterns require tiny hooks or thin yarn, and I’m like, “AGH! I want it now! And not so complicated!” Haha, so then I just whip up a pattern of my own.
hello. fantastic looking and really easy looking slippers and I totally appreciate the pattern! but i’m a beginnerish at crochet and have a question I hope you will please answer. RE: round 3 – are you stating that I go : hdc into one stitch, hdc into next stitch, then hdc 2x into the next stitch, ? OR is it: hdc into stitch, hdc into next stitch, then hdc into the next two stitches? thank you so much =)
Howdy, and thanks! In Round 3, I mean to hdc into the same stitch, hdc in the next stitch, and then work both of the 2hdc into the next stitch…as in the two stitches in the one stitch. The pattern would be (hdc, hdc, 2hdc).
hey! thanx soo much for answering, I appreciate it. it’s sad that sometimes- more often than not- that in this craft a lot of ppl don’t like to respond and treat a person trying to learn like a bad ex-boyfriend.. Peace =)
Hi. Great looking slippers and a pretty easy pattern too but I’m a beginer’ish at crochet and had a question I hope you will please clarify. RE: Round 3 after I hdc into the same stitch as join, I get confused. I get that I make another hdc into the next stitch but what about the 2x hdc? Do you mean I hdc twice into the same stitch? I hope you will answer, I really want these slippers before I get frostbite lol thanx 🙂
Sorry it took me so long to answer, and I think you commented twice, so I want to answer each one just in case you only see one response or the other just to make sure you see the answer, lolz! In Round 3, I mean to say: hdc into the same stitch, hdc in the next stitch, and then work both of the 2hdc into the next stitch…as in the two stitches in the one stitch, and NOT one single hdc into each of the next 2 stitches. The pattern of (hdc, hdc, 2hdc) means to (hdc into one stitch, hdc into one stitch, 2hdc into one stitch).
hi! Love these slippers and this is the first slipper/sock pattern I have attempted. It’s been easy so far! However, when doing round 5, how far up my foot should I go before I go to the next step? Thanks so much in advance!
Or better yet, what size shoe do you wear? You don’t have to answer if you don’t want to. I wear size 9 and I’ve been following the pattern exactly how you’ve written it so far and so far it fits.
I wear a size 8 or 8 1/2 and I think these stretch pretty well. I made them for my mom, who wears a size 6…but I put them on in the picture and I wear a larger size. That’s the good thing about using a larger hook size to make things, I think, is that they stretch more easily and can fit a variety of sizes. At the end of the rows/rounds I include how many rows/rounds I personally used in the parenthesis for everyone who doesn’t like to just wing it. Once you make your first sock from this pattern, though, it’ll become clear how the shape is being formed, and then you can adjust the lengths to fit perfect.
Thanks so much for answering my question and for helping me! I look forward to finishing these!!! They are cute! And great job on on the pattern!!