


Hexagon Boots
* The inspiration for these shoes came from the beautiful shoes you can see here. They link to the free pattern that they used and that pattern seems pretty well informative about sizing. My hexagon has a different stitch so there’s less work. I am, as my ghoulz know, a lazy crocheter, so I had to make my own pattern using larger stitches/hook, cheaper yarn, etc…because I like instant gratification. The other thing I did very different from the original pattern was that my design kind of flattens the straight edges of the hexagons a little more, especially in the heel because the original ones kept leaving me with this weaird hump on the back of the boot from the point of the hexagon. In this pattern I really try to flatten those sides more fully. The inspiration shoes are gorgeous, though, so you should check those out too!
Size K (6.50MM) hook and Red Heart Super Saver Yarn and a yarn needle. LionBrand Homespun yarn for the bottom of the boot.
*See after pattern and pictures for sizing suggestions and troubleshooting. These are for size 8 or 9, but I bet you can figure out your own size pretty easy!
Altered Hexagon for the Top of the Boot Over the Toes (One per foot):
Rnd 1: Ch 5, join in the first chain to form a ring. Working this round in the ring, ch 1, (sc, ch 3,) 6 times. Join with a sl st in first sc. (6 sets of ch-3 arches.)
Rnd 2: Join with a sl st in any ch-3 space. Ch 1. Work 5 sc in each ch-3 space around. Join with a sl st in first sc.
Rnd 3: Working in back loops only for the entire round: Join with a sl st in the center st of any 5-sc spots. Ch 3 (works as first hdc, ch-1), sc in the next 4 sc, ch 1, dc in the next (center) sc, ch 1. (sc in next 4 sc, ch 1, hdc in center sc, ch 1) 5 times. Join with a sl st in the 3rd chain of the first ch-3. Fasten off and weave in ends.
Rnd 4: Jn with a sl st in any ch space before a dc. Ch 4, (counts as first dc/ch4), dc in next ch space. (Dc in the back loops of next 4 st, dc in next ch space, ch 2, dc in next ch space) 4 times. Dc in the back loops on next 4 st, sc in next ch space, ch 1, sc in next ch space, dc in the back loops of last 4 st. Jn with a sl st in 2nd ch of beginning ch.
Rnd 5: Jn with a sl st in the ch-2 space right after the jn of Rnd 4. Ch 1, *(sc, ch 1, sc) in ch-2 space, sc in next 5 sts. Repeat from * 4 times. (2sc in ch space), sc in last 5 st. Jn with a sl st in first sc.
Rnd 6: Working in back loops only, jn with a sl st in any ch-1 space, (ch 3, dc) in ch space. Hdc around except for in the ch-1 spaces. In each ch-1 space, (dc, ch 1, dc). Jn with a sl st in the 2nd ch of beginning ch.
* For the Two Heel Altered Hexagons (you’d make two of these for each foot), work Rnds 1-5 the same then do round 6 as follows:
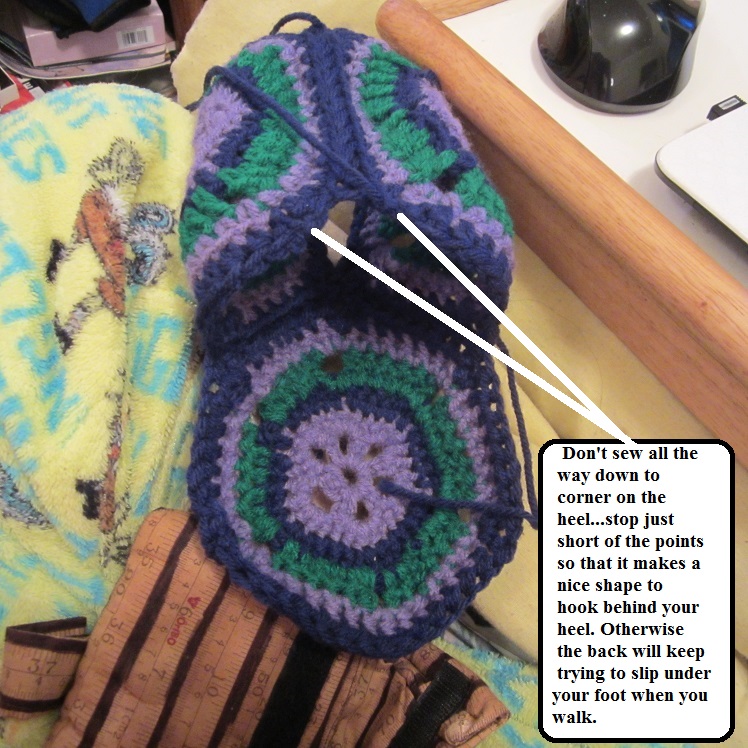
Rnd 6: Working in back loops only, jn with a sl st in the ch-1 space right after the long altered side so you can work that side last. (Ch 3, dc) in ch space. Hdc in each sc space and (dc, ch 1, dc) in each of the ch-1 corners. Once you reach the last corner, go ahead and (dc, ch 1, dc) in that space, then begin working in the entire stitch rather than just the back loops. Sc, sc, decrease, sc in next 5 st, decrease, sc in last two st. Jn with a sl st in 2nd ch of beginning ch.
Taller Boot:
If you want a taller boot like the ones in my pictures you don’t need to make the triangle. Instead make two more of the first toe hexagon for each foot. (Four total for the pair of boots). The flatter edge of these will be the top, and the opposite point will be a the center heel, and the front little triangle part.
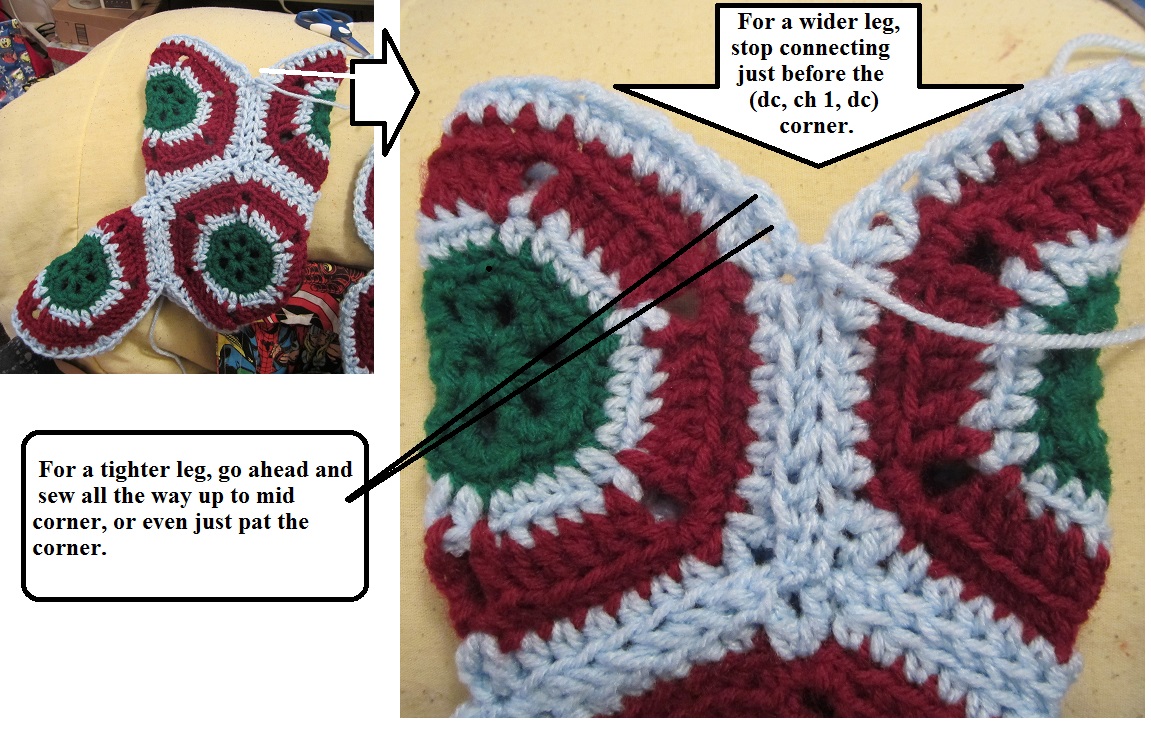
* Note for wide leg or tighter leg: For a smaller leg on these boots, sew the top of the hexagons together all the way up to the corner. For a wider leg, stop before the (dc, ch 1, dc) corners so that there will be more stretch to the top of the boot. If you choose the wide leg version, remember to check the top border notes for the changes to that too.

Shorter boot:
If you’d like a shorter boot, you can make one of these triangles and stitch it onto the front of the shoe so it will be smooth around the ankle for you to work a round to tie things together.
Triangle:
Rnd 1: Ch 3, jn with a sl st in first ch for form a ring. Ch 1, (sc, ch3 ) three times. Jn with a sl st in first sc.
Rnd 2: In ch-3 space after jn: (2sc, ch 1, dc, 2hdc). In next ch-3space: (Hdc, dc, ch 1, tr, ch 1, dc, hdc). In last ch-3 space: (2hdc, dc, ch 1, 2sc). Jn with sl st in first sc.
Rnd 3: Jn with a sl st in the ch space to the right of the tr stitch point. (sc, dc) in ch space, ch 1, (dc, sc) in next ch space. Sc in between the stitches up to the ch space of next corner. (Dc, tr, ch 1, tr, hdc) in the ch space. Hdc across to the next ch space. (Hdc, tr, ch 1, tr, hdc) in the ch space. Sc in between the stitches down to the first sc. Jn with a sl st in first sc. Fasten off.
*Sew your boot together. Check out my zillion pictures to help you get a concept of how they fit together.

Bottom of shoe:
I use the really soft LionBrand homespun yarn to make the bottom of all my shoes because normal yarn feels a little rough to me to step on, and the LionBrand yarn is like walking on a cloud!
This could get tricky because I would suggest that you make a chain that is a tiny, tiny pit longer than your foot, but the problem is when you make a chain it is difficult to decide how tight to pull/stretch the chain to make an accurate judgement. I would say make the chain with your best judgement, add 1 extra chain, then sc in the second ch from hook and across the ch. At this point you can hold that row up to your foot and see if it works out how you were imagining; that way you don’t make the whole thing and then realize it’s too short or long.
Personally, this worked for me:
Rw 1: Ch 26, sc in the 2nd ch from hook and across.
Rw 2: Ch 1, turn, sc in same st and across. I repeated Rw 2 until I had 10 rows. That seems to work for normal and wide feet.
Top Border:
Then simply jn your chosen yarn with a sl st, ch 2, dc in same st and around. Jn with a sl st in the first dc. If it seems the ankle is too wide, you can tighten it here by adding some dc decreases evenly around the round. If it is too tight, you can add a few increases evenly throughout the round.
If you are choosing the wide leg version there may be a V shaped dip on each side of your boot where you don’t connect the hexagons all the way up. You’ll still hdc around, but when you get to each side, evenly add: 2 dc, 3 tr, 2 dc, with the center tr being in the deepest part of the V dip.
More pictures and notes on construction:


*Note on sizing: I wear a size 8 1/2 to 9, and these that I made for my mom are a little snug, but they would stretch easily and fit me. So I bet these are a size 8. If you’d like to adjust these for different sizes, it would be easy to troublshoot by making the very first top/toe hexagon and draping it over your foot to get an idea if it’s working for you or not. To make it much smaller, you could do something like use an H or F hook, or a larger hook for a larger size. If it almost sits perfect but you think you might need it adjust just a little, then you could make all your changes on round 6. Replace the stitch with single crochets for a smaller fit, or double crochets or even treble crochet stitches to make them stretch more. That way you can use the same hook size and yarn type, yet you won’t have to unravel anything and spend so much trouble shooting time. You’ll just experiment with that very last round. That’s how I decided what stitch to add on the last round, myself. My mom’s feet are a little smaller than mine, but not much, so I pressed the first hexagon I made around my foot and looked at a picture of those boots to see how it compared to where it should be laying. Had it been a little small I would have added dc or tr, and if it was too big I could have left off that row all together, or added single crochet. So play with and see if you don’t wear an 8 or 9. You can figure it out! I believe in you!


Wow these are wonderful! Fell in love with them right away, but away from home so I lost them for awhile. Has taken me almost 3 1/2 hrs at 1:30 in the am to find them. Thank goodness I did. So checked stash have yarn…. might start on them in the next couple of days when done with what am doing now. Thank you for the great pattern.
I’m glad you like it! I hope they keep your toes warm!
Pingback: crochet slipper boots free pattern
Pingback: 20 Free Crochet Boots Pattern for Beginners - Blitsy
Pingback: 8 Crochet Cozy Granny Square Slipper Boots ideas - Yarn Nest Studio