
*Note: I am only a casual Star Wars fan, and though I have a great appreciation and respect for this awesome fandom, I do NOT claim to know every specific detail the way a hardcore fan would. So if you are an avid fan and see a slight deviation in design or construction that would make these projects more to your liking, by all means do it your way so that it’s true to form. I created this pattern for a pal of ours for Christmas and I used inspiration images from the movies. I tried to remain simple in design so that only the basic identifying factors are there so that there wouldn’t be anything weird going on in the patterns to distract the hardcore fans from enjoying the finished product. Also, please pardon my made-up words when I’m not sure what the pieces of the ship(s) are called. You may have to have much geeky laughter at my expense…and I suppose that’s okay as long as you’re smiling in the end with a neat ship to fly around your house shooting at your cat for at least half an hour like I did once they were complete! Of course…then I wrapped them up and gifted them to our friend…but they had to have a test flight first, right? Right.
Oh! And I wasn’t going to share the pattern at first because I was insecure, but then I showed pictures to some of my Star Wars-obsessed friends and they said they are the greatest, and that if I DIDN’T share the the pattern that the fandom would show up at my door with pitchforks and many angry shouts. Well…I don’t want that…unless most of the angry mob is going to be mostly-naked-stripper versions of Han Solo…but I bet my luck isn’t that great. So I jotted it down to share with the world. I think I managed to remember everything correctly, so enjoy!
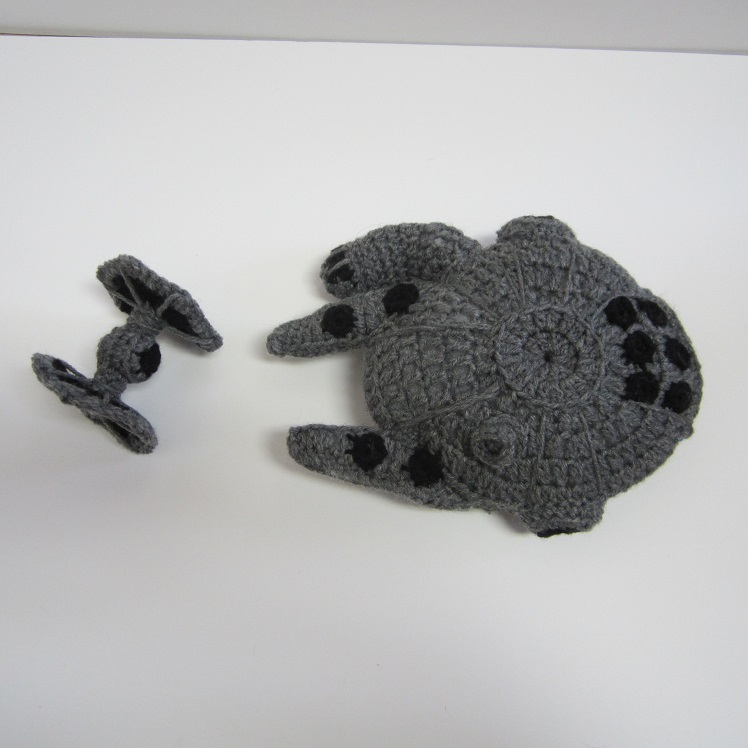
Millenium Falcon Crochet Pattern:
I use a K (6.50MM) unless otherwise stated, (some parts are made with an F 3.75MM hook), and Red Heart Super Saver Yarn.
*There are many more images at the very bottom of this post so you can better see the project as I was working on it.
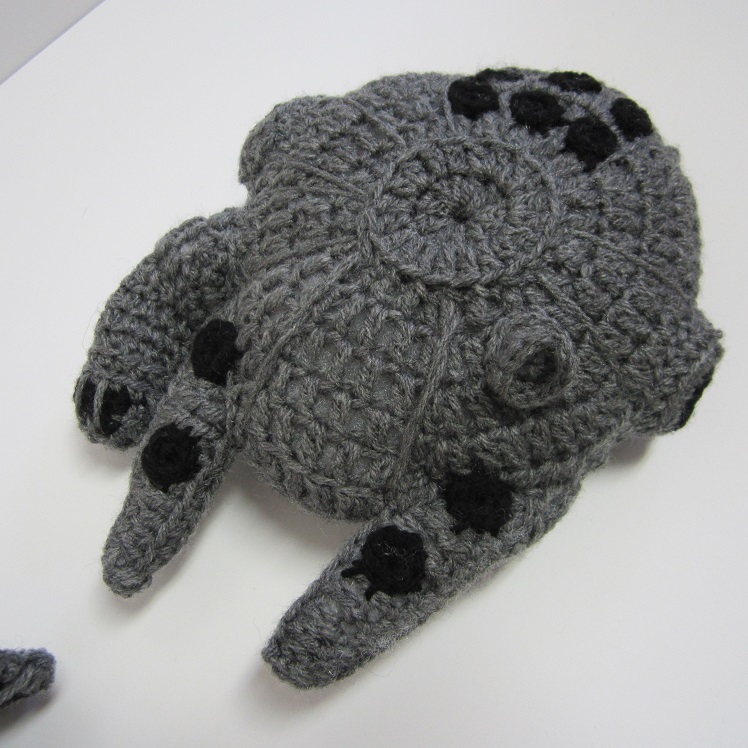
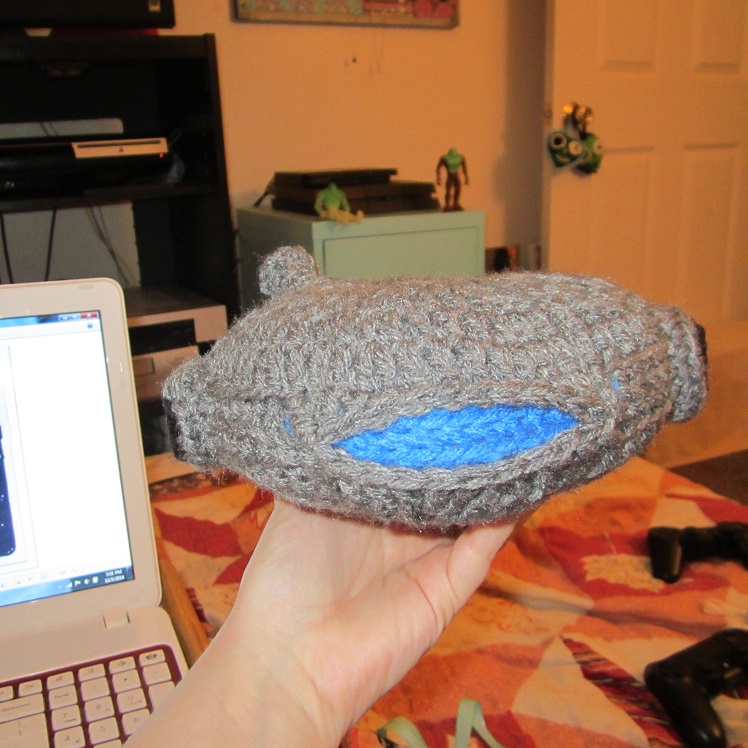
Body (Make Two; One for the top, and one for the bottom which you will sew together later.):
Rnd 1: With gray, ch 3. In 3rd ch from hook, work 10 dc. Jn in first dc. (10 dc)
Rnd 2: Ch 2, dc in same st. 2dc in each st around. (20 dc)
Rnd 3: Ch 2, dc in same st, dc in next st. (2dc, dc) around. (30 dc)
Rnd 4: Ch 2, dc in same st, dc in next 2 sts. (2dc, dc, dc) around. (40 dc)
Rnd 5: Ch 2, dc in same st, dc in next 3 sts. (2dc, dc, dc, dc) around. (50 dc)
Rnd 6: Ch 2, dc in same st, dc in next 4 sts. (2dc, dc in next 4) around. (60 dc)
Rnd 7 will create the side of the ship: Ch 2, dc in same st. Dc in next 4 sts, (dc, ch 2, sl st) in next st. Working in back loops now, sc in next 21 sts, ch 1. In front loops only for the next 12 sts, hdc, dc, hdc, sc in next six, hdc, dc, hdc, ch 1. Now back to working in back loops only again, sc in last 21 sts. Sl st to join in first dc. To finish the front of the ship, Ch 2 and jn in top of first dc. Ch 1 and working in back loops only starting with the same/current st you’re in, sc in next 6 sts. Ch 1 and sl st in same st as final sc. Fasten off. On either the top or bottom of the ship you may want to leave the tail long enough to sew the halves together.
You’ll then return to the 12 sts where you worked in the front loops only and use the back loops of those stitches to create the blueish glow of the back of the ship. In the chain before the 12 loops, jn blue with a sl st. Sc in those 12 back loops, and then sl st into the chain after the 12 loops. Fasten off. Weave in ends of one of the body’s you make, but on one of them leave a blue tail long enough to sew the top blue to the bottom blue.
Front ‘Pincers’ (Make Two):
Top: Ch 15. Beginning in 2nd ch from hook, sc, hdc, hdc, dc, dc, htr, tr, tr, ch 1, hdc, sc, sc, sc, sl st, sl st. Ch 1, pivot and sc back up the ch. In the last ch, (sc, ch 1, sc, ch 1) and jn with a sl st in first sc. Don’t fasten off.
Begin sides: Ch 1, beginning in same st as jn but working in back loops only, sc around. Jn in first sc. Sides created. Don’t fasten off.
Begin the bottom: Ch 1, in back loops only and beginning in same st as jn, sc, hdc, hdc, dc, dc, htr, tr, tr, hdc, sc, sc, sc, sl st, sl st. Faste off leaving tail long enough to tuck the bottom against the side and sew it closed. You may want to stuff the section as you go along sewing it closed.
Side…uh…circle thingies (Make two):
Rnd 1: With black, Ch 2, 6 sc in 2nd ch from hook. Jn with a sl st.
Rnd 2: Ch 1, beginning in next st, 2sc in each st around. Jn w/a sl st. Fasten off black.
Rnd 3: Join in any back loop with gray and ch 1. Working in back loops only, sc in same st, 2sc in next st, (sc, 2sc) around. Jn w ith a sl st.
Rnd 4: (Begin sides) Ch 1, in back loops only, sc in next st and around. Jn with a sl st. Fasten off leaving tail long enough to sew to side of ship. You may want to stuff as you go, and then thread some black through the center and into the ship to pull the center of this cylinder in so it doesn’t bulge.
Yeah…I don’t know what that cylindrical thingy angled out beside the ship is either. Maybe that’s where he hangs out to drive the ship? Maybe it’s a giant gun? Nah, it looks like he sits in there. I’d sit in there. It’s been too long since I’ve had a Star Wars movie marathon. Someday I’m going to try the books. I’ve heard they’re really good! So…here’s how I make the pattern for the part I’m talking about right now:
Rnd 1: With black, ch 2, 6sc into 2nd ch from hook. Jn. (6 sc)
Rnd 2: Ch 1. In back loops only this round, 2sc in the next 4 sts, then switch to black and work 2sc in the next 2 sts. Jn.
Rnd 3: Ch 1, turn work. Still with black, sc in same st and the next 3 black sts. Switch to gray, sc in the next 8 sts. Jn. You can fasten off the black.
Rnd 4-6: With gray, ch 1, sc in next st and around. Jn. (12 sc)
Rnd 7-8: Ch 1, hdc in same st. Hdc in next 3 sts, sc in next 6 sts, hdc in next 2 sts, jn with a sl st.
Rnd 9: Ch 1, hdc in same st, hdc in next 3 sts, sl st in next 6 sts, hdc in next 2 sts, jn with a sl st.
Second half:
Rnd 1: Ch 12, jn with a sl st to create a large ring. Ch 1, hdc in same ch and in next 5 chs, then sl st in the last 6 chs. Jn with a sl st in first hdc. Fasten off leaving tail long enough to sew this side to the ship.
Rnd 2: Flip work and jn yarn in the beginning chain yet working in the opposite direction. Ch 1, and beginning in same st, hdc in each in 6 chs where you worked hdc before, and sc in each 6 chains where you worked a sl st in the round before.
Rnd 3: Ch 1, and beginning in same st, hdc in each hdc st, and sl st in each sc st. Fasten off leaving tail long enough to sew two halves together matching hdc’s and slip stitches.
Stuff and sew onto the ship.
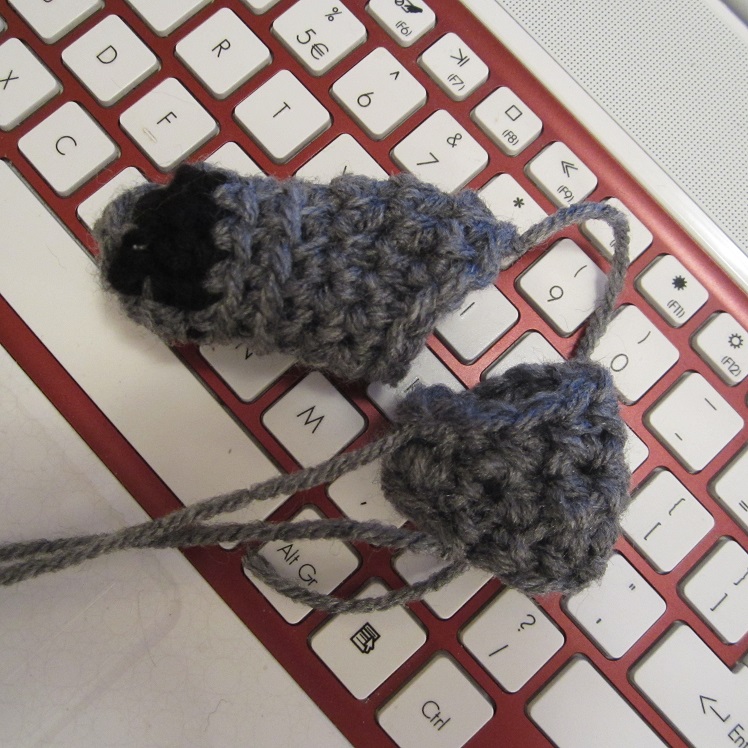
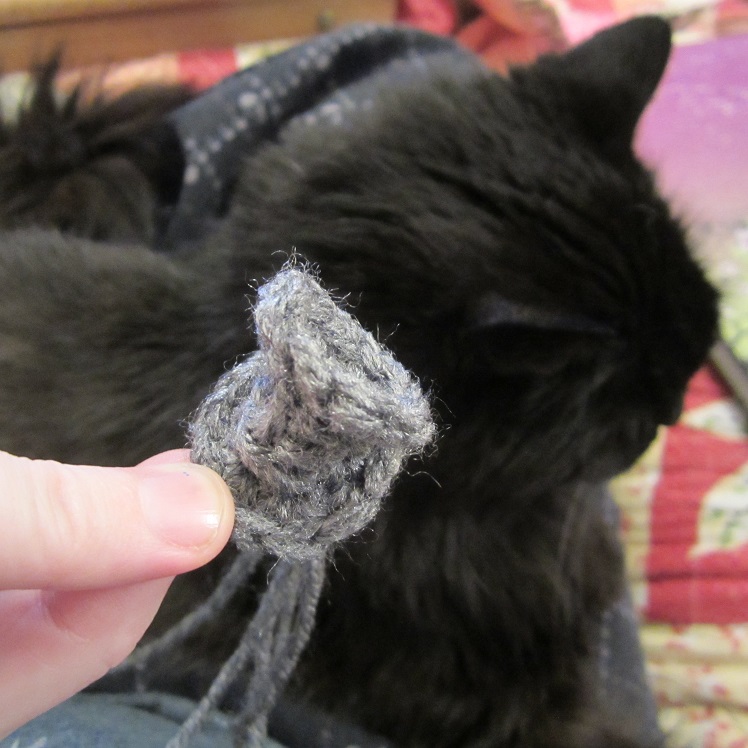
Satellite:
Use F hook (3.75MM)
Rnd 1: Ch 2, in 2nd ch from hook, work 6 sc. Jn.
Rnd 2: Ch 1. Work in the front loops only on this round. Beginning in next st, 2sc in each st. Jn. Fasten off leaving tail long enough to sew Satellite to bottom circle panel and then to sew the panel to the ship.
Bottom panel:
Continue using F hook.
Rnd 1: Ch 2, in 2nd ch from hook, work 6 sc. Jn.
Rnd 2: Ch 1, beginning in next st, 2sc in each st around. Jn. Fasten off.
For the connector: Ch 4, sc in 2nd ch from hook and last 2 chs. Fold in half and place between top and bottom.
To join, thread through the center of the satellite, and down through the connector, and down into the bottom. Do this a few times and in different areas of the center until you have it placed as you’d like. Then connect one edge of the top satellite to the bottom pannel so that it makes the satellite face the side and look more satellite-ish and less flower-ish or thimble-ish. Sew the bottom panel to the ship.
Black circular vents:
You can use felt, or you can make little circlet with black yarn and the F hook and:
Ch 2, in 2nd ch from hook, work 6sc. Jn with a sl st and fasten off leaving tail long enough to sew vent to ship.
Once you’re done with the ship accessories, sewing the part together, and adding accents, then you can make one last gray circle for the top center of the ship, and that will cover up the center where you threaded through all of the ‘lines’ to add shape to the ship. For this circle all you need to do is repeat the first two rounds of the ship body with gray:
Going back to the K hook:
Rnd 1: With gray, ch 3. In 3rd ch from hook, work 10 dc. Jn in first dc. (10 dc)
Rnd 2: Ch 2, dc in same st. 2dc in each st around. (20 dc)
Then sew on that top circle. I only use the bottom loops on the outside round so that it looks more textured.
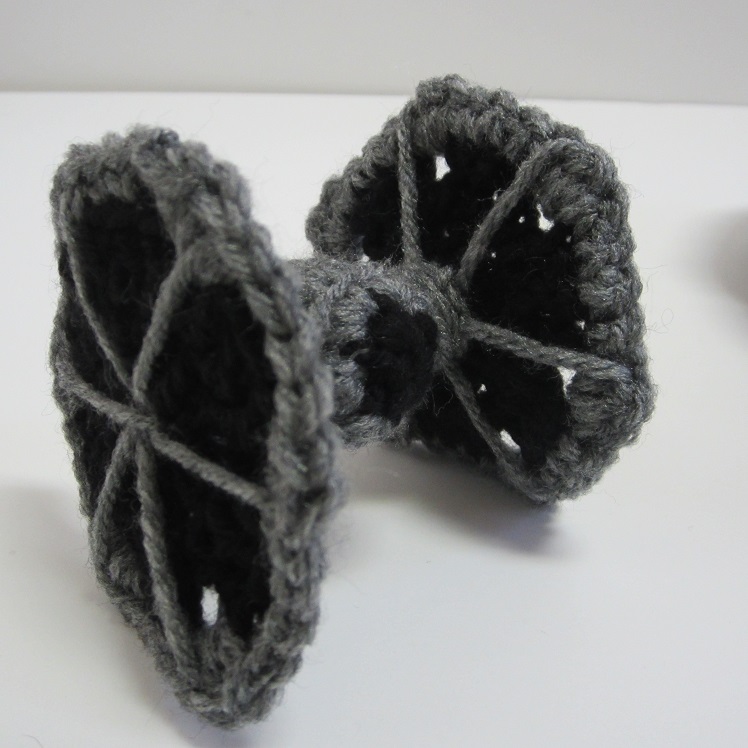
Star Wars Tie Fighter Crochet Pattern:
I use Red Heart Super Saver yarn, a K (6.50MM) hook, and an F (3.75MM) hook.
Middle Sphere:
With K hook, begin with black yarn.
Rnd 1: Ch 3, in 3rd ch from hook, sc 6. Jn. Fasten off black.
Rnd 2: Jn with gray. Ch 1, sc in same st and each st aroud. Jn. (12 sc)
Rnd 3: In back loops only, Ch 1, sc in each st around. Jn.
Rnd 4: Decrease around. Jn. (6 sc.) Stuff. If it needs another round, simply Ch 1 and decrease around again. Depending on the yarn I use, sometimes I can usually simply sl st the sphere closed after round 4, but sometimes there is enough space to where I need to add one more decrease round. If so, just add the decrease round and then sl st closed.
Sides (Make Two):
With K hook and black yarn:
Rnd 1: Ch 3. In 3rd ch from hook, (dc, ch 1, dc) six times. Ch 1, jn with a sl st in first dc.
Rnd 2: Ch 2, beginning in same st as jn, Dc, then (dc, ch 2, dc) into ch-1 space from previous round. *Dc in center stitch, (dc, ch 2, dc) into ch-1 space. Repeat from * around. Jn with a sl st in first dc. Fasten off black.
Rnd 3: With gray, single crochet in all the center stitches (the stitches that are between the ch-2 places), and in each chain-2 space, (sc, dc, sc). Jn with a sl st and fasten off.
I use gray and thread it through the center and the sides to make the crossed details along the black center.
Sides to connect the hexagons to the sphere:
Use an F hook and gray yarn. Ch 15 and sc up the chain. Fasten off leaving tail long enough to fold this strip up accordion-style and thread it in place. Then I stick it between the sides and the sphere and sew it all in place.


Satellite for Millennium Falcon (And Mizzy the Kitty helping)

Thank you soooo much for your patterns I really appreciate them as my kids are Star Wars fanatics , now they got me making every pattern I can get , thanks again Coreen xx😄😄
I’m really glad you like my patterns! 🙂 It makes me feel useful, hehehe! I like to know that people are whipping up some of the patterns and having a blast with them and smiling!
Just found this site and I love your patterns. I am going to make some for my grandchildren for their birthdays Big Star Wars Fans Keep up the great work
Pingback: 46 Must Try Star Wars Crochet Patterns - The Knit Wit by Shair
Thank you for these patterns. My oldest son – 45 years old and his youngest son – 17 years old are big Star Wars fans. My son saw the first Star Wars movie when it came out in 1978 and is still a fan. I had crocheted baby Yoda for myself & he loved it. Wanted to know if I could do some other Star Wars patterns. Am working on the Millenium Falcon right now. Can’t wait to finish it for him. Will be working on many more for him. Thanks again.
Pingback: A Collection of Star Wars Free Crochet Patterns | Aabhar Creations