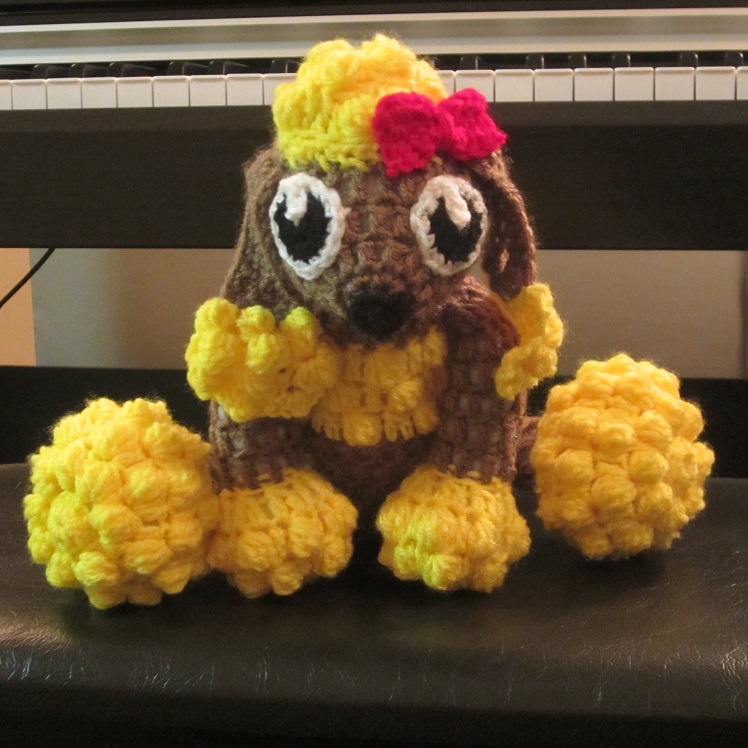
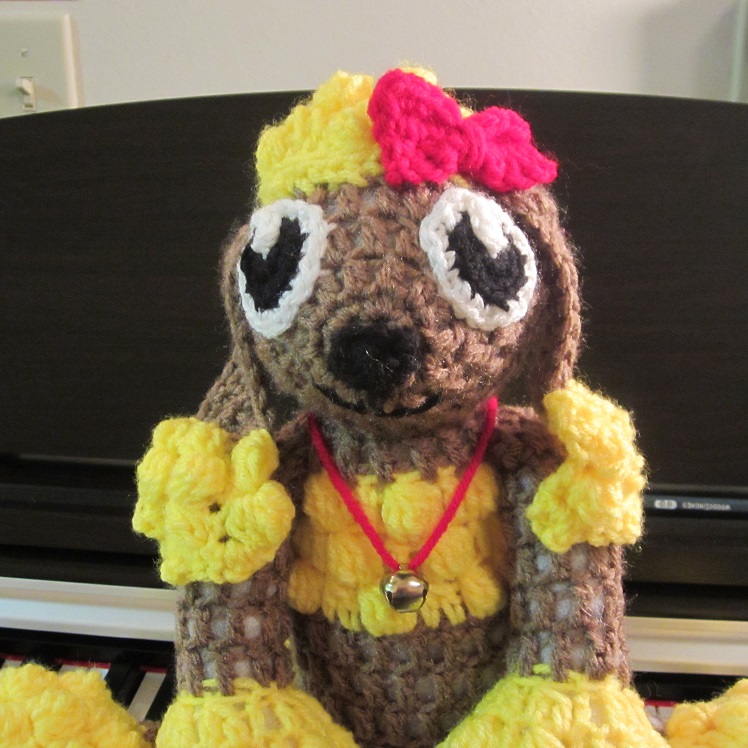
Poodle Crochet Pattern
I use a size K (6.50 MM) hook for everything except the eyes and nose. For those I use an F (3.75 MM) hook.
*******************************
Body:
*First chain does not count as a stitch unless otherwise stated.
With body color:
Rnd 1: With color A, Ch 3, dc 8 in 3rd chain from hook, jn in first dc with sl st. (8 dc.)
Rnd 2: Ch 2, 2 dc in same st, 2 dc in each st around. Jn with sl st in first dc. (16 dc.)
Rnd 3: Ch 2, dc in same st, 2 dc in next st, (dc in next st, 2 dc in next st) around. Jn with sl st in first dc. (24 dc.)
Rnd 4-8: Ch 2, dc in same st and around. Jn with sl st in first dc. Fasten off the body color. (24 dc.)
Rnd 9: With fur color, jn with a sl st where you fastened off in round 8. Ch 2, 5dc cluster in same st, dec, (5dc cluster, dec) around. Jn with sl st.
Rnd 10-12: Ch 2, dc in same st, 5dc cluster in next st, (dc, 5dc cluster) around. Jn with a sl st in first dc.
Rnd 11: Ch 2, 5dc cluster in same st, dc in next st, (5dc cluster, dc) around. Jn with a sl st in first dc. Fasten off fur color.
Rnd 12: Jn body color with a sl st where you joined Rnd 11. Working in back (inside) loops only, dc in same st and around. Jn with sl st. Fasten off leaving tail long enough to sew neck to head.
*******************************
Head:
*Beginning chains do not count as a stitch unless otherwise stated.
With body color:
Rnd 1: Ch 2, 6 sc in 2nd ch from hook. Jn with a sl st in first sc. (6 sc.)
Rnd 2: Ch 1, sc in same st and around. Jn with a sl st in first sc. (6 sc.)
Rnd 3: Ch 1, work 2 sc in same st as ch-1. 2 sc in each of the stitches around. Jn with a sl st in first sc. (12 sc total.)
Rnd 4: Ch 2, Dc in same st and around. . Jn with a sl st in the first dc. (12 dc total.)
Rnd 5: Ch 2. Dc in same st, (2 dc, dc) around to the end. Jn with a sl st in first dc. (18 dc.)
Rnd 6: Ch 2. Dc in same st and next st, 2 dc in next st, (dc, dc, 2dc) around. Jn with a sl st in first dc. (24 dc.)
Rnd 7: Ch 2. Dc in same st and next 2 st, 2dc. (Dc, dc, dc, 2dc) around. Jn with a sl st in first dc. (30 dc.)
Rnd 8: Ch 2, dc in same st and around. Jn with a sl st in first dc. (30 dc.)
Rnd 9: Ch 2, dc in same st and next st, (decrease, dc, dc) around. Jn with a sl st in first dc. (23 dc.)
Rnd 10: Ch 2, dc in same st, decrease, (dc, dec) around. Jn with a sl st in first dc. (16 dc.)
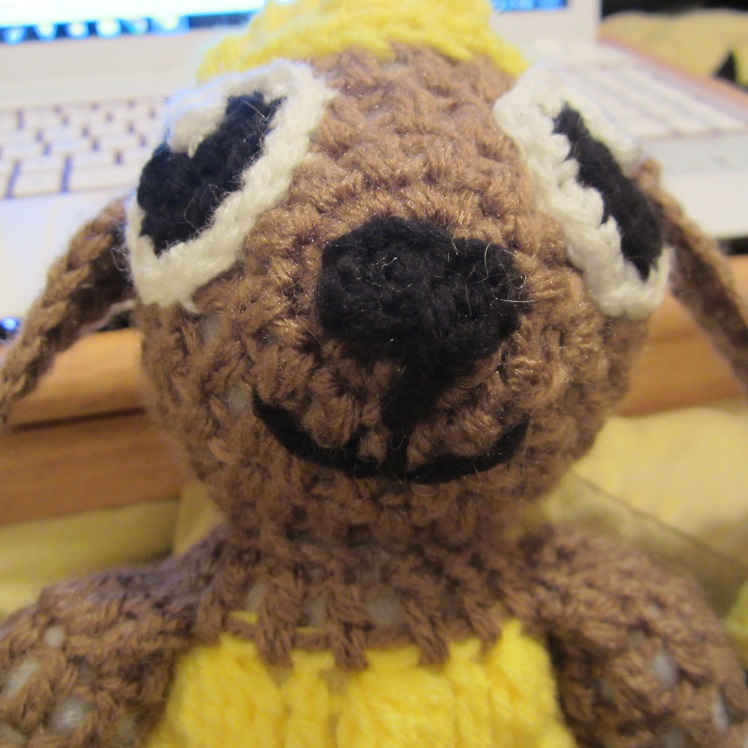
Rnd 11: Ch 2, double crochet decrease around. Jn with a sl st in first dc. Stuff the head and sl st to close. I usually sew on eyes and nose before closing the head so it’s easier to weave the ends inside the head.
*******************************
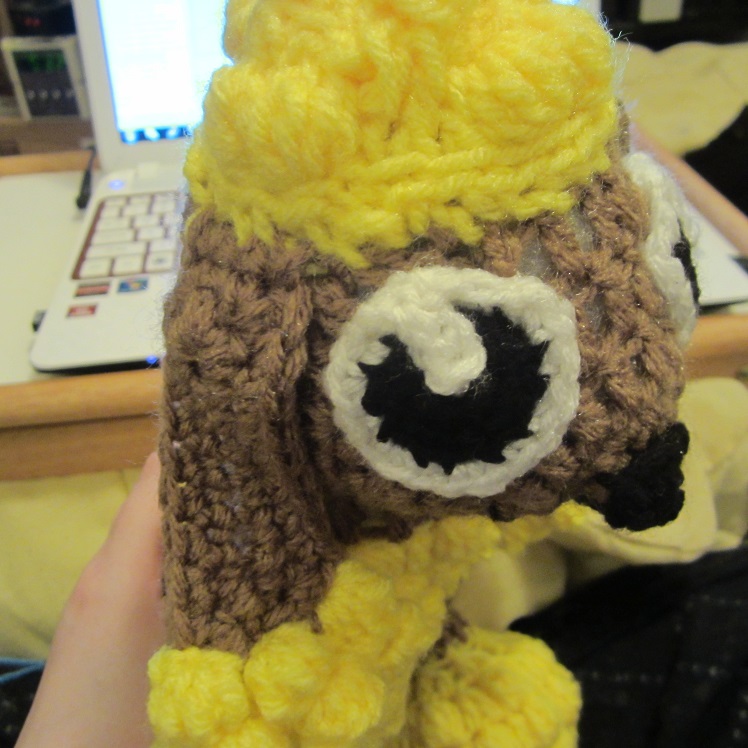
Cute eyes:
Use F (3.75 MM) hook for the eyes.
(Make two.)
Rnd 1: With black, Ch 2, 6 sc in 2nd ch from hook. Do not join. (6 sc)
Rnd 2: 2 sc in each st around. Jn with sl st in first sc. Fasten off. (12 sc)
Rnd 3: With white and working in back loops only, join with a sl st in any sc. Ch 1, 2 sc in same st as join, sc in back loop of next st, (2 sc in the back loop of next st, 1 sc in back loop of next st) around. Join with a sl st in 1st sc. Don’t fasten off. (18 sc) For pupil, you will now chain 4 and sc in 2nd chain from hook and next 2 ch. Sl st in front loop of next st. Fasten off with tail long enought to sew pupil to eye and the eye to head. Fold strip down into the black of the eye and sew it into place.

Nose:
Use an F (3.75 MM) hook and black yarn for the nose.
Ch 4, sc in 2nd ch from hook, dc in next ch, sc in last ch. Ch 1, sl st in same ch as last sc. Fasten off leaving tail long enough to stitch nose to head.

*******************************
Head Puff (Top knot):
*There are 2 pieces that you’ll sew together.
Bottom Piece:
Rnd 1: Ch 3, 3dc cluster in 3rd ch from hook, 2 dc, (3dc cluster, 2 dc) three times. Jn with a sl st.
Rnd 2: Ch 2, 2dc in same st, 5dc cluster, 5dc cluster, (dc three times in the next st, 5dc cluster, 5dc cluster) around. Jn with a sl st.
Rnd 3: Working in back (bottom of top knot) loops only, ch 1, sl st in same st. (ch 1, sl st in next st) around. Jn with a sl st in first ch. Fasten off leaving tail long enough to sew puff to the top of the head.
Top Piece:
You’ll sew this one to the center/top of the bottom round to make it a little taller.
Rnd 1: Ch 3, 5dc cluster in 3rd ch from hook, 2dc, (5dc cluster, 2dc) three times. Jn with asl st. Fasten off leaving tail long enough to sew this puff to the bottom puff.
Rnd 2: Working in back (bottom of top knot) loops only, ch 1, sl st in same st. (ch 1, sl st in next st) around. Jn with a sl st in first ch. Fasten off leaving tail long enough to sew puff to the top of the head.

*******************************
Arms:
(Make Two)
Rnd 1: With body color, Ch 3, 8 dc in 1st chain. Jn with sl st in 1st dc. (8 dc not counting 1st chains.) Fasten off body color and jn fur color in same spot.
Rnd 2: Ch 2. With fur color and working in back loops only, (dc, 5dc cluster) in same stitch and in each st around. Jn with sl st in 1st dc. (8 dc/8 puffs not counting 1st ch-2.)
Rnd 3: Ch 2, 5dc cluster in same st, dc in next st, (5dc cluster, dc) around. Jn with sl st in 1st dc. (8 dc/8 puffs not counting 1st ch-2.)
Rnd 4: Ch 2, beginning in same st as ch-2, dc dec around. Jn with sl st in 1st dc. (8 dc decrease stitches not counting first ch-2.) Fasten off fur color and stuff paw.
Rnd 5: Jn body color with sl st in same st as fastened off in Rnd 4. Ch 2. Working in back loops only, dc in next st and in each st around. Jn with sl st in 1st dc. (8 dc not counting 1st ch-2.)
Rnds 6-10: You can stuff as you go along if it’s easier for you, but I never have any trouble stuffing it at the end. Ch 2, dc in same st and each st around. Jn with sl st in 1st dc. After round 10, fasten off leaving tail long enough to sew arm to body. I like to pinch the top of the arm together and then sew it on so that it will be floppy. If you sew the limbs on in a circular fashion they will be stiff. Do whichever you prefer!

*******************************
Legs:
(Make two.)
Rnd 1: With body color, Ch 3, 8 dc in 1st chain. Jn with sl st in 1st dc. (8 dc not counting 1st chains.) Fasten off body color and jn fur color with a sl st in the same spot.
Rnd 2: With fur color and workin in back loops this round, Ch 2, (dc, 5dc cluster) in same st as jn. (dc, 5dc cluster) in each st around. Jn with sl st in 1st dc. (8 dc/8 puffs not counting 1st ch-2.)
Rnd 3: Ch 2, (dc, 5dc cluster) in same st. *Dc in next st, (dc, 5dc cluster) in next st. Repeat from * around. Jn with sl st in 1st dc.
Rnd 4: Ch 2, 5 dc cluster in same st, dc in next st. (5dc cluster in next st, dc in next st) around. Jn with sl st.
Rnd 5: Ch 2, 5dc cluster in same st, dec, (5dc cluster, dec) around. Jn with sl st.
Rnd 6: Ch 2, dec around. Jn with sl st in 1st dc. (8 dc not including 1st ch-2) Fasten off fur color and jn body color with a sl st in same spot.
Rnd 7: With body color and working in back loops only this round, ch 2, dc in same st and around. Jn with sl st in 1st dc. (8 dc not including 1st ch-2.)
Rnd 8-11: Ch 2, dc around. Jn with sl st in 1st dc. (8 dc not including 1st ch 2.) After last round, fasten off leaving tail long enough to sew leg to body.

*******************************
Tail:
Rnd 1:With body color: Ch 8, jn with a sl st in first chain to form a ring. Ch 2, dc in each ch around. Jn with sl st in first dc. (8 dc)
Rnd 2: Ch 2, dc in same st and around. Jn with sl st in first dc. (8 dc)
Rnd 3-4: Repeat Rnd 2. Fasten off body color after Rnd 4 leaving a tail long enough to sew tail to body. Tail, tail, tail. *snort*.
Rnd 5: Flip the tail so that you are working in original chain side. Jn fur color with sl st in any ch. Ch 2, 5dc cluster in same st, dc, (5dc cluster, dc) around. Jn with a sl st.
Rnd 6: Ch 2, dc in same st, 5dc cluster in next st, (dc, 5dc cluster) around. Jn with sl st in first dc.
Rnd 7: Ch 1, sc decrease around. Sl st to close. Fasten off, stuff and weave in ends.
*******************************
Poodle Ears (make two):
Rnd 1: With body color: Ch 8, sc in 2nd ch from hook and in next 5 chains, (sc, dc, sc, sc, dc, sc) in the last chain pivoting the chain as you go along so that you can work back up the chain. Sc back up in the next 5 ch, (sc, dc, sc, sc, dc) in the last (or very first, rather) chain. Jn with a sl st in the very first sc.
Rnd 2: Ch 1, sc in same st and next 7 st, (dc, sc) in next st. (This should be the stitch right after the dc from Rnd 1.) Sc, (sc, dc), sc in next 8 st, (dc, sc) in next st, sc, (sc, dc) in next st, jn with a sl st in first sc to close round. Fasten off leaving a tail long enough to sew ear to head.
For the bottom, ‘fluffy’ part of the ear, attach fur color with a sl st to the corner of one side of the bottom of the ear. This round will the right side, or the row that should face up when you’re finished. On the other rows remember to push your bobbles backwards (in-side-out) so that they’ll face up. You’ll be working in those bottom 5 stitches.
Row 1: Ch 2, 5dc cluster in same st as join, (sc, 5dc cluster) twice.
Row 2: Ch 1, turn. Sc in same st, 5dc cluster, (sc, 5dc cluster) twice.
Row 3: Ch 2, 5dc cluster in same st, (sc, 5dc cluster) twice.
Row 4: Ch 1, turn, (sc, dc, sc) in same st. *Sc in next st, (sc, dc, sc) in next st. Repeat from * one more time. Ch 1, sl st in last st. Fasten off and weave in ends.

*******************************
Bow:
Ch 8, sc in 2nd ch from hook and across. Ch 1, sl st in last ch, pivot, ch 1, sc in same st and back up chain. Ch 1, turn, sc in same st and across so that you now have 3 single crochet rows. Fasten off leaving tail long enough to weave into bow and wrap around the center before you sew it onto the head.
Sew everything together and weave in all the loose ends! Now you have a poodle pal!


Pattern by: Starling of Craftyghoul